Although Named Credentials were introduced a few releases ago, I recently discovered their usefulness. Named Credentials allow you to define the key details for the authentication of an endpoint. What’s really interesting about Named Credentials is that if you use it when making a callout, Salesforce will manage the authentication for that callout. The full Salesforce documentation is located here.
Why use Named Credentials?
There are several reasons for using Named Credentials:
- Simplified Authentication – Salesforce manages the authentication during a callout.
- Simplified Storage – No need to manage credentials using a custom storage solution.
Lets say we’re dealing with basic authentication. In the past we would need to handle multiple steps to supply the appropriate authentication value:

On top of this, we would need some mechanism to store and retrieve the Username, Password, and EndPoint (typically a Custom Setting). Using a Named Credential we can accomplish this same thing (in its most basic form) by doing this:

Setting up a Named Credential
This is the easy part. Simply Quick Find on Named Credential and click “New Named Credential”. A typical screen will appear for added the Named Credential:
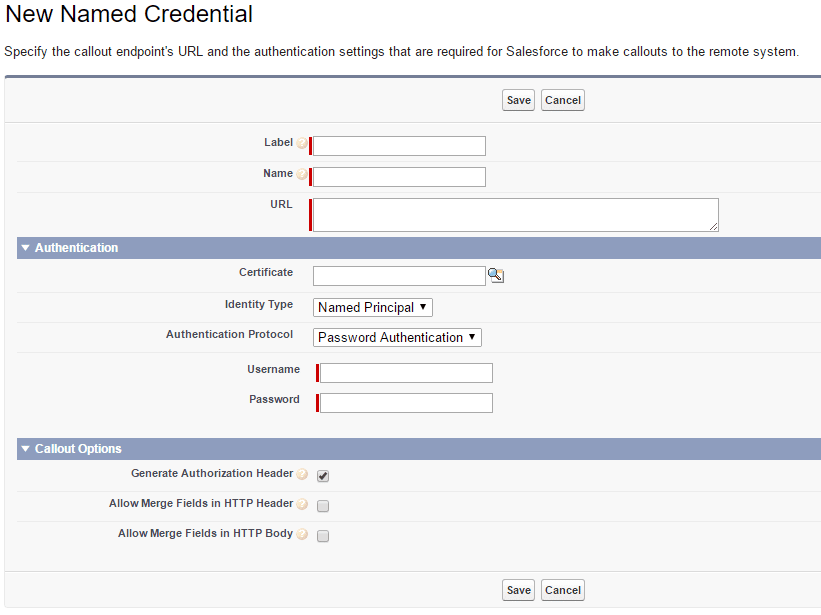
Something worth noting on this image is the field “Identity Type”. There are a few options (Per User is really interesting)
- Anonymous – Indicates no identity and thus no authentication is needed.
- Per User – Indicates authentication takes place on a Per User basis and whats really neat is than once this Named Credential is setup, the user will maintain the Username and Password under their personal settings. Select this option only if the external system needs to be accessed on a Per User basis.
- Named Principal – Indicates authentication takes place using just one set of credentials regardless of who is connecting.
More Interesting Points
If your endpoint url is a variation of the Named Credential endpoint, simply adjust the oReq.setEndpoint(‘callout:MyCredential’) to be further qualified such as oReq.setEndpoint(‘callout:MyCredential/AdditionalPath’). This can be the case if, lets say, you’re using several methods for more granular functionality. In addition, OAuth is also supported as an Authentication Protocol and will work just as seamlessly. Lastly, you can query the NamedCredential object for most fields (except username and password) which can be useful when consuming them inside of Apex.
I’d say for Salesforce developers, this is a really cool way to handle authentication and definitely should be considered when starting development.
If you would like help with using Named Credentials or an integration involving callouts, please feel free to contact us at www.cirriussolutions.com/contact.